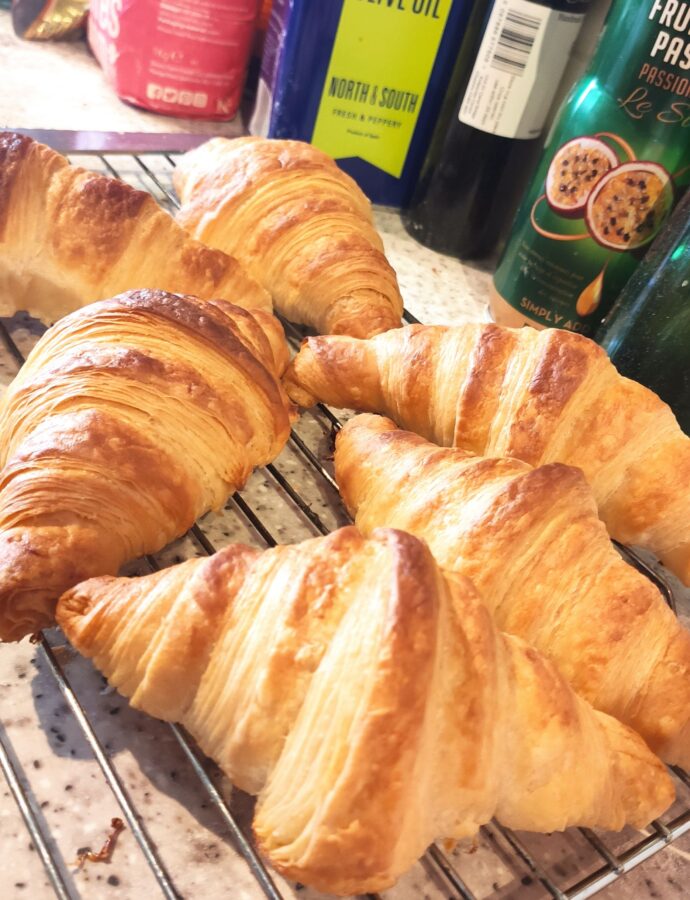
Initially following Bread Matters, which contains many fine notes, but ultimately this was not quite an adequate enough set of instructions, claiming that the lightness found in commercial bakeries cannot be replicated at home without additives and industrial equipment. I took this statement onboard in good faith, however it ultimately proved untrue.
Using Youtube channel Benny Bakes as a further jumping off point, it largely successfully recreates the quality that you would expect from a commercial bakery, with a few modifications for preference.
A note of the flour: Strength in the flour is demanded from Bread Matters, but Benny suggests only plain flour is required. I used a strong bread flour to plain flour ratio of around 3:1 to good effect. Though in truth I’m no closer to realising which should be preferred. Some tests should be performed. UPDATE (19/02/2024): Further testing on this here revealed that you can make good croissants with a wide range of flour. The original mix I used on this page proved to work well and I could be tempted to try that again, but I think my preference now is for some kind of pastry flour, such as 00 flour.
The dough: The dough must pass the window pane test. You can often get away without this, particularly when dealing with non-white doughs, but not here. The dough must be worked until you can stretch is and see through it. I am beginning to think that this is more quickly achievable by hand, nonetheless it can be done with a mixer.
Shaping: Keep things neat and square. More important than you expect. The dough should not overlap the butter, they should be evenly layered.
Dough stress: Release stress on the dough by slicing the fold.
Timing: Ideal time to start this is a few hours before you go to bed.
- 500g flour (11% protein)
- 50g Sugar
- 10g Good quality sea salt
- 250g Water
- 100g Softened butter ( At least 80% butterfat )
- 10g Dry yeast, or 30g fresh yeast
- 250g Slightly soft, good quality butter for lamination
Step one – 5 to 15 minutes:
Heat water to about body temp.
Mix all ingredients except the butter. When it’s a shaggy dough, add the butter.
Mix dough until smooth and elastic.
Dough temperature should be around 25c.
Step two – 1 to 2 hours:
Prove until tripled in size.
Step three – 6 to 12 hours:
Turn out proved dough onto a floured surface. gently flatten and book-fold, flatten and rotate 90 degrees and book-fold again. This provides a structure to the dough so it is not flabby. Attempt to leave the dough in a neat rectangle. Cover or place in a bag and allow to prove in the fridge overnight.
Before you go to bed, continue on to step four.
Step four – 5 minutes:
Using greaseproof paper top and bottom, or an appropriately size plastic sandwich bag, flatten the butter into a thin rectangle of xcm by xcm at around 5mm thick (or less).
This should exactly match the height of the rectangle that the dough will be shaped into.
Step six, Folds – 20 minutes to 1 hour:
11/02/24: I’m unsure what the total number of folds should be. It’s either 1 bookfold and 3 letter folds or 1 bookfold and 2 letter folds… This is not quite what’s written below, but I think is correct.
This is where most of the work gets done.
(In the morning) Take the the dough out of the fridge, you may need to leave it for 20 minutes to warm up a little, but it should be cold when you work it. Roll into a rectangle of X cm by X cm.
Roll it out so that it it the same height as the butter, but twice the length.
Place the butter rectangle in the middle and fold over the dough flaps to meet in the middle of the butter, then cut the folded edge.
Alternatively cut the dough flaps straight at the edge of the butter and place on top of the butter, joining the uneven dough edges in the middle, with the clean cut on the outside.
Either way, at this point smoosh the dough at the middle seam to join the two ends. If the dough isn’t flush with the butter at the top and bottom, trim the dough. You do not want any overlapping butter or dough, they should be flush.
Flour, turn over, then roll out about 60cm long.
Fold 1 – The uneven bookfold
Fold one end over about 1/3 of the length, then the other end 2/3 of the length to meet the other fold. Smoosh the ends gently together and roll slightly to flatten. Fold the dough in half.
Cut the folded end, either just at the corners or even all the way across. This releases the tension on the laminations and allows them to expand.
If the dough is starting to feel soft and warm up, wrap it up and pop it in the fridge for 20 minutes. Or else continue for the final folds.
Fold 2 – Letter fold
90 degrees from direction to the previous rolls, roll the dough out to around 60cm again.
Fold one side to 2/3 of the way across the dough, then the other side over the first fold to create a square.
Don’t cut the sides again! You need to keep some more of the rigidity at this point.
Cover and refrigerate for 1 hour.
If you have off-cuts of un-laminated dough from this step they can be used to make buns. Shape them and let them prove.
Step Seven, Shaping – 20 minutes:
Remove the dough from the fridge and let it warm for 5 minutes, rolling immediately may shatter the butter.
Flour the surface and roll the dough out so it is around 30cm top to bottom, and around 0.4mm thick (difficult to judge, but at least try for less than 1 cm), and around 50cm side to side.
Cut around the edge of the laminated dough with a ruler to produce a neat rectangle.
These laminated offcuts can be used for pastries, such as cinnamon swirls, etc.
Cut the rectangle into long triangles, at least twice as long as they are wide. A pizza roller is useful.
Method #1:
Roll the triangle, base to tip, not loosely but not so that the dough is being stretched. Sit the tip of the triangle under the base.
Method #2:
Cut a small slit in the middle of the base of the triangle. Hold the ends of the base and gently stretch out the triangle from the tip then smoosh it slightly into the worktop, to finish with a somewhat Eiffel Tower looking creation. Fold the base initially to form a tight central roll, then hold the tip with one hand and roll the base up to the tip keeping tension constantly. Sit the tip of the triangle under the base. This whole process is easier if there is some friction between the dough and the worktop.
I’m not sure which I prefer, #2 may (should…) be more authentic, less fat with a slightly closer texture. #1 should be quite fat and open.
Step Eight, Proving – 1 to 3 hours:
You want about 25c, and a slightly moist atmosphere. Over 27c will melt the butter which will ruin the lamination. I’ve also heard 32c, so I’m not sure which to believe.
In cold months you can get this done in an oven with a tray of boiled water at the bottom and something jamming the door open a crack. In my testing this stays below 30c reliably.
Alternatively it may be worth trying a cool room temp proof overnight, but I’ve not currently tried this.
Brush with a milk or egg wash. Add a dash of milk and s pinch of salt if the egg wash. Prove for 1.5 hours to 3 hours, until much bigger (at least double the size) and slightly wobbly when gently jostled. Getting the jiggle really is a key point.
Brush with the egg wash again.
Step Nine, Baking – 20 minutes:
190c fan, 18-20 minutes (depending on the size of your croissants).